
Dive into react part 2: Structuring componentsDecember 28, 2018 at 16:12
This is the second part of basic React tutorials, you can check out the first part if you haven't, also I've created a tag to serve as index for this tutorial series!
In this part we'll focus on the component creation, and how to structure our little game to be easy to understand.
Components
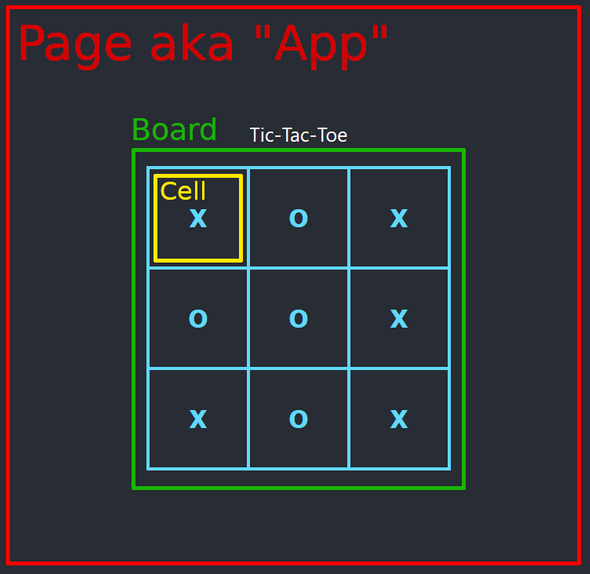
We'll structure this app in a very simple way for now. This structure involves three components:
- The "app" or the page.
- The board
- A cell
To make things even easier, we'll have a state component, the board, that will hold the match state. That is not how it might be done when using Redux, but again, we're keeping things simple.
App and Cell will be stateless, and board with state, they could look something like:
For app/App.jsx
import React from 'react';

export const App () => (
  {/* The app... */}
);
For board/Board.jsx
import React from 'react';

export class Board extends React.Component {
  render() {
    // Nothing but the pigs.
    return null;
  }
}
For cell/Cell.jsx
import React from 'react';

export const Cell = () => (
  {/* The cell... */}
);
So let's go ahead and reestructure our app so it looks like this:
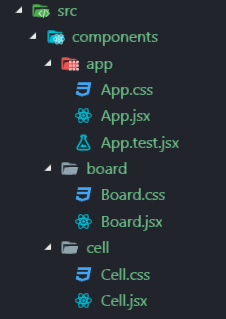
Notice the app/App.test.jsx? That is a unit test that comes by default with
create-react-app, and is here because I've moved the whole App things to
that new location. You can delete it if you want.
Remember that index.jsx, which is outside of components/, should look like
this:
import React from 'react';
import ReactDOM from 'react-dom';
import './index.css';
import { App } from './components/app/App';
import * as serviceWorker from './serviceWorker';

ReactDOM.render(<App />, document.getElementById('root'));
Specially if you replaced the original App file with the one I've told you.
App
As stated before, the "App" or page will be a nice container for now, just a stateless components that is rendered like if you were writing static HTML.
import React from 'react';
import './App.css';
import { Board } from '../board/Board';

export const App = () => (
  {/* You can go ahead and makeup this section if you're into CSS */}
  <div className="App">
    <h1>Tic-Tac-Toe</h1>
    {/* The stuff is here */}
    <Board/>
  </div>
);
Your app should display a simple blank page with a not-so-fancy title.
Board
The board will be somehow more complex. First we're going to define the state of the board, add a constructor.
import React from 'react';

export class Board extends React.Component {
  constructor(props, context) {
    super(props, context); // Do not miss this!
    this.state = {
      board: []
    };
    // Initialize imperatively, you can use other methods if desired.
    for (let i = 0; i < 3; i++) {
      this.state.board[i] = [];
      for (let j = 0; j < 3; j++) {
        this.state.board[i][j] = 0;
      }
    }
  }

  render() {
    // Nothing but the pigs.
    return null;
  }
}
Other way, instead of using for could be...
this.state = {
  board: [1,2,3].map(() => [1,2,3].map(() => 0))
};
But again, use whatever looks more understandable to you. I always encourage people to use code that is self-descriptive and easy to understand what does, rather than how it does. So you could write something like:
this.state = {
  board: createMatrix().of(3).by(3).filledWith(0).end()
};
But this tutorial ain't about code style or design, maybe some day I'll post articles about this topic. For now, we'll focus on just making things work.
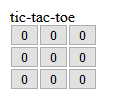
Now we've filled our board with a matrix that kinda looks like this:
We'll manage the state randomly, so on click we'll change the state:
import React from 'react';

export class Board extends React.Component {
  constructor(props, context) {
    super(props, context);
    this.state = { board: [] };
    for (let i = 0; i < 3; i++) {
      this.state.board[i] = [];
      for (let j = 0; j < 3; j++) {
        this.state.board[i][j] = 0;
      }
    }
  }

  /**
   * This function will return a handler that on called, mutates the state
   * of the board.
   * @param {number} i
   * @param {number} j
   * @returns {() => void}
   */
  onClick(i, j) {
    return () => {
      const { board } = this.state;
      board[i][j] = Math.round(Math.random() + 1);
      this.setState({ board });
    };
  }

  render() {
    // Nothing but the pigs.
    return null;
  }
}
Simple huh? Take a moment to understand what really does this piece of code:
function onClick(i, j) {
  return () => {
    const { board } = this.state; // Grab the .board property
    board[i][j] = Math.round(Math.random() + 1); // Change it
    this.setState({ board }); // Pass the changes to .setState(...)
  };
}
Specially the () => {...} part, if you're not into Es6.
We're going to (Finally) fill the render method of the board!
import React from 'react';
import './Board.css';
import { Cell } from '../cell/Cell';

export class Board extends React.Component {
  constructor(props, context) {
    super(props, context);
    this.state = { board: [] };
    for (let i = 0; i < 3; i++) {
      this.state.board[i] = [];
      for (let j = 0; j < 3; j++) {
        this.state.board[i][j] = 0;
      }
    }
  }

  onClick(i, j) {
    return () => {
      const { board } = this.state;
      board[i][j] = Math.round(Math.random() + 1);
      this.setState({ board });
    };
  }

  render() {
    const { board } = this.state;
    // This is just like writing:
    // const board = this.state.board;
    return (
      <div className="Board">
        {board.map((row, i) => (
          <div className="Board-row" key={i}>
            {row.map((cell, j) => (
              <Cell key={`${i}.${j}`} onClick={this.onClick(i, j)} state={cell} />
            ))}
          </div>
        ))}
      </div>
    );
  }
}
Cell
Since we're passing the onClick event handler to the cell as a prop, we don't
need to manage any sort of state inside of the cell, our component will look
pretty simple:
import React from 'react';
import './Cell.css';

export const Cell = ({ onClick, state }) => (
  <button className="Cell" onClick={onClick}>
    {state}
  </button>
);
Now you should start seeing something more than a simple title:
Clicking randomly to those buttons should change the state, leading to something like:
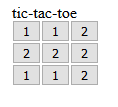
Remember the state matrix? It should be something like this by now:
And that's it for now! We've got our components mounted and ready to start playing with some deeper state management!
If you missed something or your code does not work you can check out the above pen to see the code working!
What do you think? What is the most confusing part? And as always, thanks for reading!