
Dive into react part3: Dealing with the stateJanuary 07, 2019 at 10:01
There we are, today we're going to create the state of the application!
A brief word about the state
The state of the application should always be separated from the view. This means that by all means, you should never store the state inside the view, and if wanted to interact, pass messages (events, function calls, whatever) to the corresponding controller.
Imagine using a silly (web) view like:
<div id="Super app">
  <button id="click"></button>
  <button id="see">What is the state?</button>
</div>
Therefore this is BAD! And you should not do things like:
const btn = document.getElementById('click');
const what = document.getElementById('see');

what.onclick = () => alert(`The state is "${btn.innerHTML}"`);

btn.innerHTML = 'Click me!'; // This is "the state" of the app
btn.onclick = () => btn.innerHTML = 'You already did!';
Instead what you should do, would be more like:
class Controller {
  constructor(id) {
    this.view = document.getElementById(id);
    this.view.onclick = () => this.state = 'You already did!';
    this.state = 'Click me!';
  }

  get state() {
    return this._state;
  }

  set state(state) {
    this.view.innerHTML = String(state);
    this._state = state;
  }
}

const what = document.getElementById('see');
const ctrl = new Controller('click');

what.onclick = () => alert(`The state is: ${ctrl.state}`);
You can try this simple "Controller" right away:
You might be thinking "Whoa dude, that is pretty dumb, who would store the state inside of a button?", think twice. This might be not so obvious if you have a switch, a toggle button or a text input! You might fall in the trap of the laziness and let the component tell you the state.
alert('You fool! My evil state is: ' + myTextInput.value);This principle of moving away the state can (And should!) be applied to all applications, either they're web, mobile or desktop. No matter the environment or the language used.
But, where is React in all this?
There mate, is where React shines: It lets you create a component that acts as the controller and holds it's own state, while letting the DOM being the view.
import React from 'react';

// Pretty simple!
class Comp extends React.Component {
  constructor(props, ctx) {
    super(props, ctx);
    this.state = {
      pressed: false
    };
    this.onClick = this.onClick.bind(this);
  }

  // Toggle
  onClick() {
    const { pressed } = this.state;
    this.setState({
      pressed: !pressed
    });
  }

  // Draw the view!
  render() {
    const { pressed } = this.state;
    return (
      <button onClick={this.onClick}>
        {pressed ? 'On' : 'Off'}
      </button>
    );
  }
}This is the builtin way of doing state management in React.
As you can see, the state management becomes much more easy to maintain and understand in our application, and React forces us to do it in this way, otherwise we will not be able to perform updates on the view.
The big brothers of the state management
As I mentioned earlier in my second post about the topic, this can be done with other designs as well.

Redux logo source: https://redux.js.org/
![]()
Flux logo source: https://facebook.github.io/flux/
The main idea behind those patterns and libraries is to provide a consistent state to the application, and a place to store it that will be easy to understand, scale and fix when things go wrong. The tradeoff of this is that your application needs tons of boilerplate code.
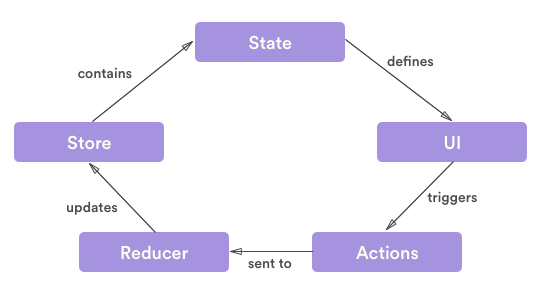
Image source: https://stackoverflow.com/questions/45416237/axios-calls-in-actions-redux
We'll talk about those in a future tho, now we will use a component as "the store" of the state, and try to make as dumb as possible components under this.
After all, as Dan Abramov said in medium "You might not need Redux", and after all, this is a simple tic-tac-toe.
Back to our state management
The idea is simple, our Board will be the state container, and will
communicate to it's children what is happening, then, the children will pass a
message back to the parent, using a dispatcher provided by it.
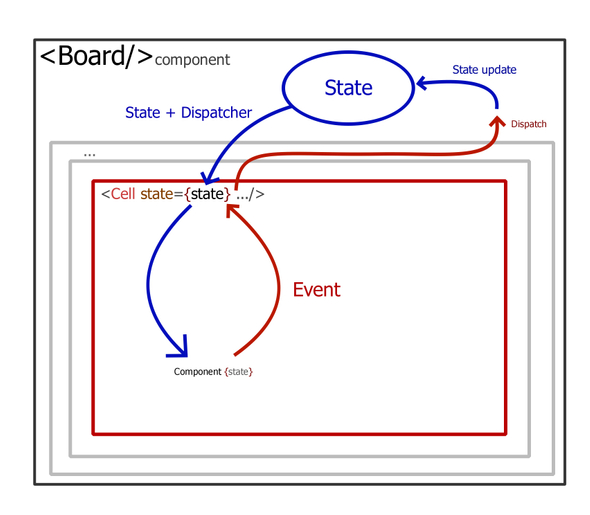
This will make more sense while we're building the component's logic, let's go.
Remember the Cell component? We're going to tweak it a little to make it
display something that represents the data, not just the raw data:
import React from 'react';
import './Cell.css';

const SYMBOLS = [ ' ', 'X', 'O' ];

export const Cell = ({ onClick, state }) => (
  <button className="Cell" onClick={onClick}>
    {SYMBOLS[state] || '?'}
  </button>
);
The first change is to add a mapping array that will tell us what string is the appropriate for the player that owns the cell, as we're using numbers, we can use an array as a map.
The || '?' part is a fallback case, if the state is inconsistent or not what
it should be we can know it because we'll see a bunch of ? laying around.
Nothing more there! Now, the heavy stuff: The Board component.
import React from 'react';
import './Board.css';
import { Cell } from '../cell/Cell';

export class Board extends React.Component {
  constructor(props, context) {
    super(props, context);
    this.state = {
      board: [],
      current: 1
    };
    for (let i = 0; i < 3; i++) {
      this.state.board[i] = [];
      for (let j = 0; j < 3; j++) {
        this.state.board[i][j] = 0;
      }
    }
  }

  onClick(i, j) {
    return () => {
      const { board, current } = this.state;
      if (board[i][j] === 0) {
        board[i][j] = current;
        this.setState({
          board,
          current: current === 1 ? 2 : 1
        });
      }
    };
  }

  render() {
    const { board } = this.state;
    return (
      <div className="Board">
        {board.map((row, i) => (
          <div className="Board-row" key={i}>
            {row.map((cell, j) => (
              <Cell
                key={`${i}.${j}`}
                onClick={this.onClick(i, j)}
                state={cell}
              />
            ))}
          </div>
        ))}
      </div>
    );
  }
}
The fist step is to add the current player, we do so by creating a state
variable called current, and defaulting it to 1:
this.state = {
  board: [],
  current: 1
};
Then, after we have our current player variable, we should tell to the board what happens whenever a player hits a cell.
const { board, current } = this.state;
if (board[i][j] === 0) {
  board[i][j] = current;
  this.setState({
    board,
    current: current === 1 ? 2 : 1
  });
}
If the cell is 0, then we can assign it to the current player. Then, we flip
the current state using current === 1 ? 2 : 1. In case that the cell does not
contain a zero, it will ignore the attempt.
As a final touch, we will add a simple label that will tell us what player is currently player, first export the translation table:
import React from 'react';
import './Cell.css';

export const SYMBOLS = [ ' ', 'X', 'O' ];

export const Cell = ({ onClick, state }) => (
  <button className="Cell" onClick={onClick}>
    {SYMBOLS[state] || '?'}
  </button>
);
Notice the export. Then, just add a simple label that reads the state:
import React from 'react';
import './Board.css';
import { Cell, SYMBOLS } from '../cell/Cell';

export class Board extends React.Component {
  constructor(props, context) {
    super(props, context);
    this.state = {
      board: [],
      current: 1
    };
    for (let i = 0; i < 3; i++) {
      this.state.board[i] = [];
      for (let j = 0; j < 3; j++) {
        this.state.board[i][j] = 0;
      }
    }
  }

  onClick(i, j) {
    return () => {
      const { board, current } = this.state;
      if (board[i][j] === 0) {
        board[i][j] = current;
        this.setState({
          board,
          current: current === 1 ? 2 : 1
        });
      }
    };
  }

  render() {
    const { board, current } = this.state;
    return (
      <div className="Board">
        <h3>
          Current playing: Player {current} [{SYMBOLS[state] || '?'}]
        </h3>
        {board.map((row, i) => (
          <div className="Board-row" key={i}>
            {row.map((cell, j) => (
              <Cell
                key={`${i}.${j}`}
                onClick={this.onClick(i, j)}
                state={cell}
              />
            ))}
          </div>
        ))}
      </div>
    );
  }
}
Extra! Hide the symbol table
The above code will run pretty the same as with those modifications, but we can, instad of expose the symbol table, expose a function that transforms the number into the symbol plus the fallback value:
import React from 'react';
import './Cell.css';

const SYMBOLS = [ ' ', 'X', 'O' ];
export const toSymbol = state => SYMBOLS[state] || '?';

export const Cell = ({ onClick, state }) => (
  <button className="Cell" onClick={onClick}>
    {toSymbol(state)}
  </button>
);
And then, replace the use in Board.jsx:
import { Cell, toSymbol } from '../cell/Cell';

// ...

<h3>
  Current playing: Player {current} [{toSymbol(state)}]
</h3>

// ...
The preview
As always, here you have a pen to check out the code if does not work. But
remember: In the pen all classes are in the same file, do no import or
export is present, but the logic stays the same! Also I have introduced a
small css to make it a little bit more tidy:
button.Cell {
  min-width: 32px;
  min-height: 32px;
  vertical-align: middle;
}
For the sake of making this post shorter, the next post will include the victory conditions and management of state reset.
If you could keep the track of everything, I'm glad to hear! If not, or you could keep the track because you're an experienced programmer then tell me, where I can improve? what do you think? Thanks for reading!